Tuesday, November 10, 2015

USING AHCI


AHCI stands for Advanced Host Controller Interface, which is a new hardware communication standard from Intel that can significantly improve the performance of SATA drives. One of the best AHCI features is Native Command Queuing (NCQ). With NCQ your hard drive can decide in which order to read and write data. This way your computer can access the data from one area of the drive before moving to a different part of the disk. This way data is opened in one smooth move and the hard drive's read head doesn't have to move all over the place. This reduces wear and tear, noise, and improves performance.
Windows XP users: AHCI drivers are not included on the Windows XP and earlier installation CDs, as AHCI was developed long after the release of Windows XP. To enable the AHCI mode, you need to use a driver floppy and the F6 method when installing Windows XP. Otherwise your hard drive won't be detected. However, it is still possible to enable AHCI without reinstalling your XP. Just update the IDE driver through Device Manager and change your SATA Mode to AHCI (instead of IDE) in the BIOS.
Windows Vista and 7 have native AHCI support, which is great. The not-so-great thing is that most likely your system doesn't have AHCI enabled in the BIOS, which means that Windows simply does not know that it can use AHCI.
First of all, you'll need to check if you have AHCI installed by doing the following:
  1. Click on Start and type Device Manager in the search box.
  2. In the Device Manager, expand the IDE ATA/ATAPI Controllers section.
  3. Look for Standard AHCI 1.0 Serial ATA Controller. If it's there, then your system is already using AHCI. If not, we'll need to enable it.
As a rule, AHCI support needs to be activated in your BIOS, but only before you install Windows. Otherwise you risk ending up with Blue Screens of Death, which will eventually require a reinstall. Fortunately, it's possible to avoid this by editing the registry prior to activating AHCI support. Here is how to enable Microsoft AHCI driver in the Windows 7 registry:
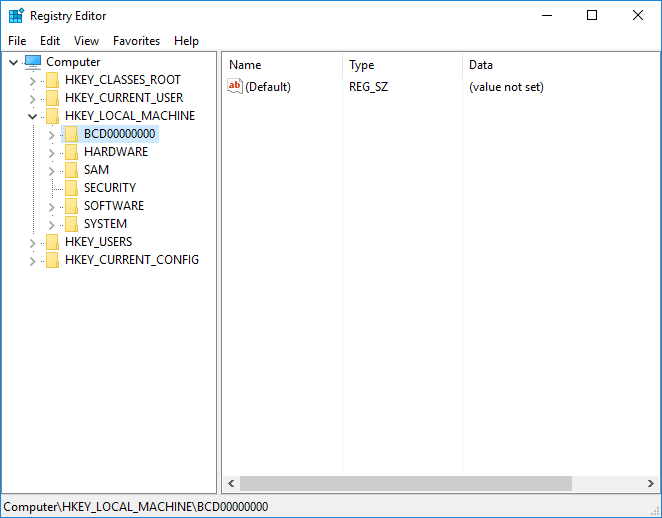
  1. Click on Start and type regedit in the Search box to open Registry Editor.
  2. Navigate to HKEY_LOCAL_MACHINE\SYSTEM\CurrentControlSet\services\msahci and expand it
  3. In the right-hand pane, locate the START key
  4. Set its Value to 0 (zero)
  5. Close Registry Editor.
  6. Alternatively you can change the value under HKEY_LOCAL_MACHINE\SYSTEM\CurrentControlSet\services\iaStorV to enable the Intel RST driver.
The results differ from system to system, so you'll need to experiment a bit and check which driver works better for you, msahci (Microsoft AHCI) or iaStor (Intel RST). I recommend using AHCI, but you can always revert to the IDE driver if AHCI wasn't fast enough for you.
Now you can reboot your computer and enter the BIOS where you can enable AHCI.

 The specific instructions vary from manufacturer to manufacturer, so you'll need to consult your support documentation. Once you've found the required setting and activate AHCI, save all changes and reboot your PC. Windows will install the needed driver upon reboot, which you can later confirm through the Device Manager. You might need to reboot once more to activate the driver.  

UPDATING THE BIOS

Updating your computer's BIOS can fix bugs, improve compatibility with new devices, significantly decrease booting time and increase the overall performance.
You can download BIOS updates from your PC/motherboard's manufacturer website. But first you'll need to find out the BIOS version your computer is running on. To do that, simply type msinfo32 in the Search box in Windows 7/Vista, or in the Run box in Windows XP and hit Enter. This will open the System Information tool where you will be able to see which BIOS version you are using.
Be very careful and make sure that you download the right BIOS update file that is intended for your particular model. Installing a BIOS that is not intended for your model will most likely wreck your computer and make it unbootable. Most BIOS updates will warn you if you try to install them on hardware that doesn't match, but it's best to be careful in the first place.
Most PC manufacturers make updating BIOS fairly easy - all you need to do is download the update and run the .exe file. Let the update handle everything and then reboot your computer. If you are using a laptop, make sure you are not running out of battery during the update, as you will not be able to boot up if the update gets interrupted.
 If you have an older computer, you might need to create a bootable drive and update the BIOS manually. Some systems will allow you to simply download an app that will configure a bootable USB drive or a blank CD/DVD to update your BIOS. Other systems are not that user-friendly and will require you to copy some files to your bootable drive, restart your PC, and enter the BIOS during startup. You will then need to change the boot order so that your system launches the update instead of booting your operating system from the hard drive. You'll need to consult the BIOS update documentation for more specific instructions.

SYSTEM RESTORE


System Restore is a handy Windows feature that will help you roll back your computer to a previous state. It's very useful in case of minor faults like incorrect software installations and driver conflicts. However, you must understand that System Restore does not actually back up your computer and doesn't monitor your personal files. This means that you should never rely on it alone.
Now, some people claim that disabling System Restore will boost computer performance. That's not true. System Restore only kicks in when your system is idle, which means it can't slow you down. However, System Restore can and does waste disk space. Like a lot of things in Windows, the default System Restore configuration is not ideal for most users and takes up too much space. So, if you have better plans for your gigabytes, you should configure System Restore to eat up less space.

Windows 7 users:
The Windows System Restore function got immensely improved since the days of XP. The Windows 7 version of System Restore is filed under System Protection and does a lot more thorough job at protecting you from data loss by using Shadow Copy features. Basically, this means that Windows can create snapshots of your drive and backs up your files even when they are in use. This makes the Windows 7 System Restore a lot more effective and improves your chances of successful recovery.
All the configuration tips that I recommend for XP apply to Windows 7 as well. To configure System Restore in Windows 7 do the following:
  1. Go to Start and right-click on Computer. Go to Properties
  2. Click on the System Protection link on the left-hand side
  3. Click on Configure to manage System Restore settings and the amount of disk space it uses

Now let me show you how to manually create restore points in
Windows 7:
  1. Click on Start and right-click on Computer. Go to Properties
  2. Now click on the System Protection link on the left-hand side
  3. Click on the Create button to set a new restore point
  4. Type in a description that will help you identify this restore point
  5. Click Create and you're done!
Windows XP users:
The XP version of System Restore is pretty basic and quite often pretty useless. For a start, it's slow (big surprise) and it often doesn't do what you want it to do. It's still worth having it enabled, though, just in case. To check whether System Restore is enabled, press the Windows key + the Pause/Break key to open the System Properties window and go to the System Restore tab. There you'll see the list of your disks and partitions, as well as System Restore status.
If you use a third-party restore program, you can disable the Windows one altogether.
This will free up heaps of space without putting you at risk. You can disable System Re- store by checking the relevant check-box.
If you have more than one disk or a couple of partitions on your computer, then you don't need System Restore to be monitoring all of them; it's enough to monitor the drive or partition where the OS is installed. Usually it's drive (C:). To disable System Restore on all other drives, highlight them one by one, click on Settings and check the relevant check-box.
It's a good idea to restrict the amount of space System Restore can use for its purposes.
To do this, simply go to the System Restore tab, click on Settings, and adjust the slider.
Set it to something like 5% and you'll be fine.
Sometimes you might want to create a restore point manually, especially before tweaking or installing unknown applications. It might prove handy - you never know. Creating a restore point is dead easy:
1. Click on Start - All Programs - Accessories - System tools and then click on System Restore
2. Select Create a restore point and click Next
3. Describe your restore point, so that you can easily find it in case you need it
4. Click on Create to create the restore point.

Right, now you know how to use and configure System Restore.  

SURFING PROTECTION

Surfing protection is used to block the entrance of malware while surfing the internet. This can be done in many ways. Using a firewall, you can block most kind of attacks, also using an anti-virus / anti spyware program with it will help to find the intruders in your computer.
Another type of method is to add some trusted third party software which will test the webpage you are entering and give a feedback / trust rating based on their evaluation and scanning. Some advanced software can block the website if they find malware presence even before its properly presented to the user.
It is very important to note that many people who are experiencing trouble with pop-up advertisements and tool bars suffered as they were not aware of this featured software.
Alternate method using software

You can enable the surfing protection feature in Advanced System Care by going to its settings.

SPEED UP FILE BROWSING


Do you ever use network folders and printer? My bet is you don't. But did you know that Windows looks for them by default every time you open Windows Explorer, just in case you do? This is no big deal, but it can slow down file browsing. Disabling search for network folders and printers can make using Windows Explorer and browsing files much more enjoyable.
Windows XP

  1. Open My Computer.
  2. In the menu, click on Tools, click on Folder Options and go to the View tab.
  3. Now uncheck Automatically search for network folders and printers.
  4. Click Apply and click OK.
  5. Reboot your PC.

Windows 7


  1. Go to the Control Panel and open Network and Internet.
  2. Click Network and Sharing Center.
  3. Select Change advanced sharing settings.
  4. In the Network discovery section, choose Turn off network discovery.     

RECOMMENDED SOFTWARES

Some software that can help you optimize the system has been given below. Using this software will help you to enable 90 percent optimization easier.

Advanced system care is a famous system optimization utility with a 10 million customers. It comes in both paid and free versions. The paid versions are said to achieve 300 percent performance increase. The free version is also a great community of tools that can be used to speed up and resolve computer problems. But it lacks some features such as Winfix, Smart RAM, Internet booster, Registry cleaner, Disk cleaner etc. as opposed to paid version. You can download the full software here.
Link: https://goo.gl/WsVOyI

Wise care 365


Wise Care 365 is an all-in-one PC tune-up utility. It will keep your Windows secure, clean and fast. It is a good alternate for Advanced System Care. You can download the full software here. 
Link: https://goo.gl/oHEDb4

Driver booster is a great utility to update your pc’s outdated drivers. The advantage in updating the driver are more features, more secure and better performance of hardware equipment. You can download the full software here. 
Link: https://goo.gl/VUsGcN
Admuncher is a great application that you can use completely free of cost. It is widely used to block unnecessary advertisements in the browsers. Using this software combined with AdBlock will greatly enhance your browsing experience. You can download the full software here.
Link: https://goo.gl/ymjxC2
Recovery
Wondershare Recovery Manager


Wondershare Recovery Manager Recover over 550 unique file formats. Fully recover documents, emails, photos, videos, audio files and more. Recover 100MB files for free with the free trial version. Read-only, risk-free, and cost-effective Windows data recovery software. An easy-to-use wizard, no prior recovery skills needed. You can download the full software here. https://goo.gl/qbbfCc
Antivirus

Bitdefender Antivirus Plus is the acknowledged Antivirus of the Year. With a non-intrusive and extremely fast scanning technology, it offers essential silent security against e-threats.
  1. Best antivirus and antispyware defense.
  2. Extremely fast. Non-intrusive. With Bitdefender Photon™
  3. Guards your online transactions. Protects your digital identity.
  4. No popups. No configurations. Experience Bitdefender Autopilot
You can download the full software here.
Link: https://goo.gl/eknNKb

Now with 5 layers of protection. Introducing the new Norton Internet Security. Advanced Internet and antivirus protection for anywhere you go and anything you do online. Provides proactive protection, so you can do what you want online, knowing you’re protected Improved SONAR technology and live 24x7 global threat monitoring stay ahead of emerging threats Ultra-fast Internet detection layer stops most threats before they can even reach your computer.
You can download the full software here. https://goo.gl/s08RGf

5 % discount coupon code: 6EA73DF0C8 (to be used during payment, not on product seller page)

SOFTWARE UPDATION


The software updates should be done on a priority basis. Apart from giving new features most developers provide patch for their software vulnerabilities. First one to take care is our windows system itself. We recommend you to install all the critical updates on time.

 Also the software installed in your Windows PC should be updated. Some of the most important ones to be cared are Flash, Java, any security products installed and any product that visit internet and fetch information.

SHREDDING A FILE


Some files stored in your system can be recovered after deleting it. This can be security threat. So using a shredding program can help you there. It makes sure that the file is not retrievable in a usable format. You can use the File Shredder feature in Advanced System Care to do this.

REMOVING MALWARE

Malware is a broad term. It consists of virus, worms to spyware and adware sometimes. It is advisable to remove traces of malware because it can cause data damage and system crashes. Also mostly we are afraid of their system resource utilization and data theft.
The first method we are going to use is prevention. Its advised that ‘Prevention is better than cure’. In order to prevent malware please do keep these points in mind

  1. Always use a surfing protection software. Many free programs are out there. Choose an authentic one.
  2. Install an antivirus software and make sure it is always updated. Scan once a week.
  3. Use windows updates.
  4. Try not to visit adult and other harmful site.
  5. Download attachments from only trusted sender and always scan before opening it.
  6. Avoid using pen drives/CD/DVD without proper antivirus scanning.
Antiviruses:
You can use any of the antivirus listed here. These are some of the most effective antiviruses available in the market:


  • Bitdefender Antivirus
  • Norton Antivirus

REMOVING INVALID SHORTCUTS


Obviously the first method to find out the invalid shortcuts placed on desktop is by clicking on them. Provided they produce an error message related to ‘Invalid shortcut’. One other method is to delete the registry key associated with the shortcut. It’s easier to use a shortcut fixing software to resolve these issues.
Alternate method using software:
You can use the Shortcut Fixer feature in Advanced System Care or use the native one in Wise cleaner.


REMOVING ICONS FROM DESKTOP

The first thing you should do is move all files from your desktop. Windows keeps your desktop in the RAM and the more stuff there is, the less RAM you have for other things. So, if you have tons of large video files plastered on your desktop, your computer will take longer to start up. And if you are generally low on RAM, a cluttered desktop may decrease overall computer performance. That's why you should move all files to ordinary folders.
Now that you've moved all files from the desktop, it's time to organize your icons. First let's get rid of the icons you don't use. Windows has a tool that will help you do it.
Here is how to use it:
Windows XP:

  1. Right-click on an empty space on your desktop and click Arrange Icons By
  2. Click on Run Desktop Cleanup Wizard
  3. Click Next
  4. Uncheck the boxes for the icons you wish to remove and click Next
  5. Click Finish to confirm.

Windows will create an Unused Desktop Icons folder where it will store the unused icons. You will then be able to either add more icons to the folder or restore the ones you need.
Windows 7:

  1. Right-click on an empty space on your desktop and click View, then click Show desktop icons
  2. This will uncheck the option and make your icons disappear. You can get them back whenever you need them by re-enabling the Show desktop icons option.

Now that you've gotten rid of the icons you never use, you can automatically arrange the remaining icons. Here is how:
Windows XP:

  1. Right-click on an empty space on your desktop, click Arrange Icons by and then click Auto Arrange. Windows will place your icons in rows.
  2. You can then click on Type and customize how Windows arranges your icons.

Windows 7:
  1. Right-click on an empty space on your desktop, click View, then click Auto Arrange. Windows will arrange your icons.
  2. Click on Sort by and select how you want Windows to sort your icons (Name, Size, Item Type, and Date).
Now that your desktop looks neat, it's time to remove hidden clutter - junk files.
Alternate method using software

 You can use the Shortcut Fixer feature in Advanced System Care.

REMOVING ADVERTISEMENTS


Advertisements can be brought by both websites and malware. It consumes your data and slows down the loading of a webpage. Here we will provide some of the basic things that you can do to avert advertisements.


  1. Do not download software from unknown source and be selective while installing toolbars coming bundled with them.
  2. Use a browser add-on like ADblock or Adblocker Plus.
  3. Download and use a freeware utility called ‘Admuncher’. You can download it from https://www.admuncher.com/
  4. Use a good anti malware product to destroy adware.

REGISTRY DEFRAGMENTATION


As you already know, the registry is altered every time software is installed or uninstalled, as well as when Windows configures settings. These constant changes cause the registry to grow in size. Registry cleanup does help a great deal, but it creates a new problem - registry fragmentation. This happens because deleting obsolete entries leaves blank bits of space within the registry. These bits of space don't get filled by new information and thus the registry becomes bloated and fragmented. As the registry loses its linear structure, it takes longer and longer for Windows to access it and your programs need longer to open.
It is better to use a simple and efficient program for cleaning the registry defragmentation as this can cripple your system.

Alternate method using software


 You can use the Registry Defrag feature in Advanced System Care.

RAM UPGRADE


RAM aka Random Access Memory, has always been considered important by enthusiasts. The purpose of RAM is similar to the purpose of your own short-term memory. It provides the computer with a space to load information useful for a current task. The more RAM you have, the more information you can store.
There's usually a limit to the amount of information you need to store. 32-bit processors have a limit of 4 GB and 64-bit can support much more. During every-day tasks, and even some demanding tasks, you don't need more than four gigabytes of RAM. Adding more is only useful in certain situations. For example, people who edit HD video, play games frequently might need more memory.

 RAM is one of the few components that most laptops allow a user to upgrade. However the specifications are to be looked a bit careful as the RAM varies with voltage and frequency. The usual frequency stays between 800MHz-1600 MHz.

RAM MANAGEMENT

RAM or Random Access Memory is an essential component that provides temporary storage space for the programs to be executed in processor. Typically, the amount of RAM installed on your device varies from 512 MB to 32 GB depending up on the performance need. For a typical user with his normal functions such as browsing internet, using office 2-4 GB RAM is enough. More RAM available for work is always desired.
There are couple of ways you can increase the amount of RAM in the system.

  1. Buy a new RAM module and install it in your system.
  2. Terminate unnecessary processes in the task manager.
  3. Close unnecessary programs.
  4. Remove unnecessary shortcuts and icons in desktop.
  5. Clear temporary cache.
  6. Use a memory management application.
  7. We recommend to use a trusted software to manage the memory.

Alternate method using software:

You can use the Smart RAM feature in Advanced System Care.

PROCESSOR UPGRADE


The CPU is the brain of the computer. It performs all the calculations and computations necessary for programs to run. These calculations take place within millionths of a second. As the programs get more complex, the time required for the calculations will also increase. Processing a photo may take a second or two but encoding an hour-long video will take an hour or more.
Buying a faster processor can significantly decrease the time these tasks take. For example, a dual-core Core i5 can batch process videos three to five times quicker than an Atom processor.
Here are a list of processors currently available in the market. Choose the one that best suits your needs:
Basic Processors (Can handle web surfing, document writing, etc...)
  • AMD Turion
  • Atom
  • Intel Celeron
  • Fusion E-Series
Entry Level Processors - (Suitable for entertainment and everyday tasks)
  • Intel Pentium Series
  • AMD A-Series
  • Intel Core i3
Performance - (Suitable for resource intensive tasks like gaming)
  • Intel Core i5
  • Intel Core i7 (dual-core)
  • Intel Core i7 (quad-core)
High-End - (The fastest currently available)
  • Intel Extreme Edition
 If you use only the web and basic productivity applications like Word, Excel, PowerPoint etc. a basic processor will suffice. Everyone else will need at least an entry-level or performance CPU.

CLEAN PRE-FETCH FOLDER

Every time you launch a program for the first time, Windows creates a file that will make the program launch quicker the next time you use it. This little file is stored in a folder called Prefetch. Like any other folder, the Prefetch folder can get pretty cluttered as it accumulates files for different applications. As a result, all that clutter starts slowing down your computer, even though it's meant to be speeding it up. The solution is to give your Prefetch folder a cleanup every now and again.
To clean the Prefetch folder, do the following:
  1.   Click on Start and type prefetch in the Search bar (XP users: go to Start - Run, type prefetch in the Run box). Hit Enter
  2. The Prefetch folder will open
  3. Now simply highlight everything in the folder by pressing Ctrl+A and hit the Delete key.

POWER OPTIONS


Power options can be tweaked for increasing the performance of PC. Follow the below given method to unlock its full potential.
  1. Go to ‘Control Panel->Hardware and Sound->Power Options->Edit Plan Settings’
  2. Click on ‘Change advanced power settings’
  3. Collapse ‘Processor power management’
  4. Change the value of ‘Minimum processor state’ to a higher one than the default value.
  5. Change ‘Switchable Dynamic Graphics’ and ‘Graphics power setting to ‘Optimize performance’ and ‘Maximize performance’ respectively.
  6. Click Ok button.

The above procedure will increase the clock speed of processor to its maximum capability. Some processors may auto control their clocks, But this trick works on most PCs.

PC SELECTION


Four factors to take care while selecting your brand new laptop are
  1. Performance
  2. Portability
  3. Screen Size
  4. Thickness

1. Performance
Performance is a concern for most people in the hunt for a new laptop. But the fact is that most users are not aware of what should be the performance needed. If you go behind performance, you will end up in expensive laptops. But the fact is that, you may not be using its full potential in its lifetime.
Here are some common tasks that will benefit greatly from more powerful hardware.
  • Audio/Video de/encoding and editing
  • Photo editing
  • Programming
  • Editing large spreadsheets, documents and PDFs
  • Games
Some people don't frequently perform any of these tasks, and if that sounds like you, a basic laptop should suffice.
Users who want a computer that can handle several of these workloads at least several times a week, on the other hand, should start thinking about the benefits of an Intel Core i5 or i7.

2. Portability
Battery life is a commonly quoted statistic that holds just as much weight as a computer's performance. Usually the systems are capable of providing 80 % of the battery backup as promised by the manufacturer. But for intensive workloads such as gaming it could drop to 40-50 %. But the good news is that there are many laptops which will retain the battery for up to 5 hours with ease. Some ultra-books can even achieve up to 13 hours.

3. Screen Size
Display size of laptop varies from 10.1" to 18.4". The size of the display naturally determines the size of the rest of the laptop, which in turn determines what that laptop can do.
Let's break down laptops into categories based on their display:
  • 10.1" - Netbook. Extremely portable, but difficult for people with large hands. The small size of the chassis limits hardware to CPUs with poor performance.
  • 11-12.9" - Small ultraportable. Still easy to carry, and easier to use. Faster hardware can fit, but there are still limitations on performance.
  • 13-14.1" - Large ultraportable. Easily fits in all but the smallest bags, but difficult to use on an airplane and most forms of public transport. CPU performance can be excellent, but GPU performance iGIMs often lacking.
  • 14.2-17" - Mainstream laptop. Somewhat portable, but it won't fit in some bags. Performance is solid and some models offer excellent GPUs. A good all-rounder.
  • 17" or more - Desktop replacement. Won't fit in all but the largest backpacks. The best mobile hardware will fit, including high-performance GPUs. Most gaming laptops and high-end multimedia laptops are in this category.
4. Thickness

Products with a thick profile are considered outdated or unattractive, and sometimes ignored entirely. Now a day’s Ultra-books which has a thin profile has become trendy. Thin laptops are attractive, weighs less, portable. But thick laptop on the other hand can fit in high performance hardware inside. It also has better cooling mechanism and better battery backup.

OPTIMIZING WINDOWS APPEARANCE


Turn off wallpaper and disable screensaver.
Both the wallpaper and the screensaver are not needed by your PC and only have an aesthetic value. True, screen savers were a necessity for old CRT screens, but now they are pretty much obsolete, just like the screens that required them.
Switching your wallpaper and screensaver off is super-easy:
Windows XP:
  1. Right-click somewhere on your desktop and click on Properties
  2. Go to the Desktop tab and set the background to None. You can then choose a background color
  1. that you like best.
  2. Now go to the Screensaver tab and set it to None. Click Apply, then click OK.
Windows 7:
  1. Right-click somewhere on your desktop and click on Personalize
  2. Click on the Desktop Background icon, then select Solid Colors in the Picture Location drop-down box and choose a background color that you like best
  3. Click on the Save changes button
  4. Now click on the Screen Saver - None icon to disable the screensaver
  5. Click OK.


Adjust color scheme and visual effects
Remember that the pretty Windows is not the fastest Windows, especially if you have the "eye candy" Windows 7 with Aero and transparency enabled. So, if in your book performance is more important than looks, you should consider choosing a more minimalistic look. Here is how:
Windows XP:
  1. Press the Windows key + the Pause/Break key to open System Properties
  2. Go to the Advanced tab
  3. Locate the Performance section and click on the Settings button
  4. Now select the Adjust for best performance radio button.
This will make your Windows look very minimalistic and even out of date. If you don't mind that, then simply enjoy the performance gain. But if you'd still like XP to look more like XP, simply select the Custom radio button and select the visual effect you like.
Windows 7:
If it's the first time you are customizing Windows 7 appearance settings, you will need to switch Aero off. Yes, it looks nice, but it's also exceptionally resource-hungry. Here is how you can disable Aero:
  1. Right-click somewhere on your desktop and go to Personalize
  2. Now you can select a less resource-hungry theme, such as Windows 7 Basic or Windows Classic.
 If you want to keep Aero, but still gain some performance, click Window Color in the same window and uncheck the Enable Transparency box. You can also use the Windows XP method described above to adjust Windows 7 for best performance.  

MULTIPLE DRIVE CREATION


Creating multiple drives is a helpful strategy to improve overall speed of a computer. Most of the time computers come equipped with an OS and a single drive. But creating multiple drives in a system will improve efficiency of virtual memory and paging. Also it helps in the classification of drives and efficient defragmentation.
Creation of multiple drives can be done using following method.
  1. Click start button
  2. Type ‘Computer Management’.
  3. On the search results select the same.
  4. In the ‘Computer Management’ window, Select ‘Disk Management’.
  5. Select the single drive.
  6. Right click on the drive and select ‘Shrink Volume’.
  7. On the windows opened, select the size of new drive to be formed.
  8. Click on Shrink.
  9. Now you will be able to see a newly unformatted drive.
  10. Right click on the drive and select ‘New Simple Volume’.
  11. Click next after choosing the needed size.
  12. On the Assign Drive Letter or Path page, specify whether you want to assign a drive letter or path and then click Next.
  13. Use the Format Partition page to determine whether and how the volume should be formatted. If you want to format the volume, choose ‘Format This Volume’. Be sure to check ‘Perform a quick format’. Click next.
  14. Click Finish.

 Congratulations, now a new partition is created.

KILLING RUNNING PROCESSES

One thing that all operating systems have in common is that they rely on hundreds of processes to run correctly. Basically, there are three main types of processes that can be running on your system - a) essential and non-essential system processes; b) processes run by applications installed on your computer; c) viruses and malware. Ideally, you'd like to have as little of the non-essential processes as possible because having too many running processes reduces your PCs speed. And you definitely don't want any viruses and malware!
To check which processes are running on your system simply launch the Windows Task Manager by pressing Ctrl+Shift+Esc and go to the Processes tab. You will see the list of all processes running on your system and information on how much CPU and RAM they are consuming. The Task Manager also provides a PID and shows under which user profile the processes are running.
So, now you know what's running. But how to find out what exactly are all those processes, which ones are essential and which ones are not? While some process names are very straight-forward and you won't have any problems identifying the programs that run them (for example, Skype.exe), some process names won't give you any clues. But don't despair - there are plenty of ways to find out.
Manager displays running programs, processes, services, shows you which files are locked by other files, and allows you to unlock them.
Process Explorer allows you to expand process trees and view which services are part of which process. This is especially handy when you are researching a process like svchost.exe and need to know which tasks a particular svchost.exe instance is responsible for.
Now, if you want to disable unneeded processes, it's best to manage them either by disabling the software that runs them on startup or simply disable unnecessary Windows services that are responsible for running these processes. This approach is a lot better and safer than killing the process in the Task Manager. But if you are sure a process is run by a piece of malware, it's best to kill it immediately and run a scan with up-to-date security software. Here is how you can kill a process in the Task Manager:

  1.  Open the Task Manager by pressing Ctrl+Shift+Esc
  2. Go to the Processes tab
  3. Right-click on a process you wish to stop and select End Process.

UNINSTALLING UNUSED SOFTWARE


When you buy a new computer you may notice many applications pre-installed in it. These may include trails versions of antiviruses, shareware programs or multimedia applications. If you find these programs to be useless you should definitely uninstall them, as they will only slow down the computer and also take up precious hard disk space.
Uninstalling programs is really easy. Here is how you can uninstall software via the Control Panel:
Windows XP:
  1. Click on Start and go to the Control Panel
  2. Click on Add or Remove Programs and wait for the list to populate
  3. To uninstall a program, highlight it and click on the Remove button (sometimes Change / Remove)
  4. Confirm your action and wait for the program to be uninstalled. You may need to restart your PC to complete the removal.
Some programs may give you a warning that removing some components of the application can make other programs run incorrectly. If this happens, simply click No to All and proceed. The important components will not be deleted.
Windows 7:
  1. Click on Start and go to the Control Panel
  2. Now click on Uninstall a program
  3. You will get a list of installed software. Highlight the program you want to uninstall and click on Uninstall or Uninstall/Change
  4. Confirm your action and wait for the program to be uninstalled. You may need to restart your computer to complete the removal.


Alternate method using software:
You can use the Uninstall programs feature in Advanced System Care.