Saturday, October 17, 2015

DISABLE REMOTE DIFFERENTIAL COMPRESSION

Remote Differential Compression is a Windows Vista and 7 feature that detects file changes over a network, so that the changes can be transferred with minimal bandwidth usage instead of having to transfer the whole file after it has been moved. While this feature can potentially be useful, it's not needed by average home users. Besides, it can consume quite a bit of system resources, so it's not a bad idea to disable it.
To disable Remote Differential Compression, do the following:

  1.   Go to Start and open the Control Panel.
  2. Under Programs, click on Uninstall a program.
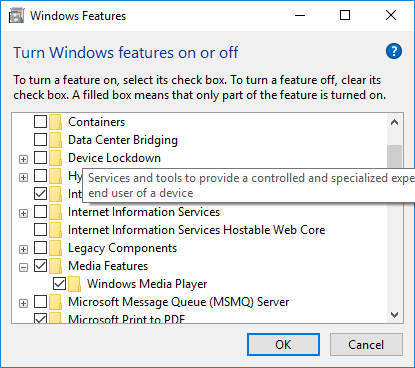
  3. Now find the Tasks section and click on Turn Windows features on or off.
  4. In the new window, locate Remote Differential Compression and uncheck it.
  5. Click OK and you're done!   

DISABLE MULTIMEDIA FEATURES

Windows media player comes pre-installed as the default media player in windows. But its lack of features forces many users to use alternatives such as VLC player, KMPlayer, etc. If you are the type of user who finds Windows Media Player is not enough for your needs, and you no longer need it, you can easily disable the Media Features and save some space on your system.

  1.   Open Control Panel.
  2. Select Programs
  3. Click on Turn Windows feature on or off.
  4. From the check box uncheck Media Features.
  5. Click OK.
  6. Reboot the system to reflect the changes.

DISABLE INTERNET EXPLORER


Internet Explorer comes installed as default browser in windows systems. But because of many issues users tends to use alternatives such as Mozilla Firefox, Google Chrome, Opera etc. Since disabling the Internet Explorer can have some space and speed advantage on our system we are providing the steps to disable Internet explorer.

  1.   Open Control Panel .
  2. Select Programs
  3. Click on Turn Windows feature on or off.
  4. From the check box uncheck Internet Explorer.
  5. Click OK.
  6. Reboot the system to reflect the changes.

DISABLE HIBERNATION


Hibernation is one of the power-saving modes offered by Windows. This feature is very useful if you want to turn off your computer without losing all your open documents, browsers, programs, and current settings. So the next time your computer starts up, you can resume working from where you left off.
However, hibernation has some downsides. The shutdown takes longer because all your open files and settings from the RAM will be written to a file on your hard disk. This file is called hiberfil.sys, which is roughly the size of your RAM. This means that if you have 2GB of RAM, your hiberfil.sys file is something close to 2GB. Now, that's perfectly fine if you do use hibernation. But if you don't, then this file is just a waste of space. You can free up this extra space by disabling hibernation. Here is how:
  1. Make sure you are logged in as administrator
  2. Click on the Start button and type cmd in the Search box (XP users will need to click on Start - Run and type cmd). Hit Enter. This will open the Command Line
  3. In the Command Line, type powercfg /hibernate off and hit Enter.
If at any time you'd like to re-enable hibernation, simply repeat steps 1-4, but type powercfg /hibernate on in step 3 instead.


DISABLE GUI BOOT

Another way to speed up Windows boot by a few seconds is to disable a feature called GUI boot. Remember that little animated progress bar you see when you boot up Windows? A pretty useless thing if you ask me. We are going to disable it:
  1. Click on Start and type msconfig in the Search bar (XP users will need to click on Start - Run and type msconfig there). Hit Enter.
  2. In the new window, go to the Boot tab (BOOT.INI in Windows XP)
  3. Find and check the No GUI Boot option (/NOGUIBOOT in XP)
  4. Click Apply, close Msconfig and reboot your computer for the changes to take effect.


DELETING TEMPORARY FILES

You can save some space on your computer by deleting temporary files. Temporary files are being created as a part of installation of a new software or by running programs.
The temporary files are stored in ‘C:\Users\YourUsername\AppData\Local\Temp’.
To access this easily press ‘Windows + r’ key combination.
In the displayed box type ‘%temp%’

 Select the files and press ‘Shift + Delete’ key combination to delete them permanently.

CLEANUP GARBAGE FILES

Disk cleanup is one of the most important parts of computer maintenance. Remember that more the free space there is, the faster your computer will run. Performing disk cleanup is essential because Windows accumulates unnecessary junk files that massively reduce computer performance. These files are just like the junk hidden deep in your wardrobe - you can't see it, but it's still there and it's wasting space. So how do they get created in the first place?
Most Windows programs create temporary files for a number of purposes, but mostly when a program needs more memory for its tasks or when a program is working with large chunks of data. Programs like Microsoft Office also create temporary files and use them for keeping a copy of your data in case the program crashes.
In the perfect world, temporary files would be deleted automatically when the programs close. Unfortunately, sometimes things go wrong. Poorly written applications, improper shutdowns, and freeze-ups often leave temp files behind. That's how gigabytes of clutter are created. Another type of temporary files is Temporary Internet Files. These files are created by the browser and are often kept for a lot longer than necessary.
Deleting junk files is easy enough - all you need to do is run the built-in Disk Cleanup tool.
Windows XP:
  1. Click on Start and go to Programs - Accessories - System Tools
  2. Launch the Disk Cleanup tool
  3. Select the drive you want to cleanup and let the program analyze it
  4. Review the results and click OK to clean up junk files
This should free up a considerable amount of disk space. If you want to free up even more space, delete all except the most recent System Restore Points. To do that, just click on the More Options tab and click on Clean up under System Restore
Windows 7:
  1. Click on Start, type Disk Cleanup into the search box
  2. Launch the Disk Cleanup tool. It will offer you to choose the drive you wish to clean up
  3. Click OK and let the tool analyze your drive
  4. Now review the list of files to be deleted and click OK
Just like XP, Windows 7 allows you to delete old System Restore Points and shadow copies. To do that, simply click on Clean up system files and then click on Clean up under System Restore and Shadow Copies. Make sure you are running the tool as administrator - otherwise you won't get the option to delete System Restore Points


Alternate method using software:
You can use the Disk Cleaner feature in Advanced System Care or use the native one in Wise cleaner.